My Timesheet gives you one place to add work, log time, review your weekly totals, and submit your time for approval. You can record time against project tasks or use non-project activities for internal and ad hoc work.
You can also log time directly from a task. Managers and admins with the required permission can manage another team member's time through List View.
In this article
- Before You Start
- Open My Timesheet
- Understand the Timesheet Grid
- Navigate Between Weeks
- Add Tasks and Non-Project Activities
- Log Time from My Timesheet
- Log Time from a Task
- View Billable and Non-Billable Totals
- Edit a Time Entry
- Delete a Time Entry
- Submit or Withdraw Your Timesheet
- Log Time for Someone Else
- FAQ
Before You Start
Time Tracking must be enabled for your account. If you do not see an option to log time, contact your admin.
See How to Enable and Configure the Time Tracking Feature in Rocketlane?.
Open My Timesheet
- Select Timesheets from the left navigation.
- Select My timesheet.
Understand the Timesheet Grid
Each row in My Timesheet represents a work item, such as a project task or non-project activity. The row includes the time entries recorded against that work item, its weekly total, and its current submission or approval status.
| Column | What it shows |
|---|---|
| Project | The project that is associated with a task-based row. Non-project activities are not associated with a project. |
| Work | The task or non-project activity against which time is recorded. |
| Monday through Sunday | The time entries recorded against the work item for each day. The current day is highlighted, and an icon indicates time off or a company holiday. |
| Total | The total time recorded against the work item for the week. |
Non-project activities let you record time that is not associated with a customer project or task, such as internal meetings, administrative work, training, or other ad hoc activities configured by your organization.
Rows are not grouped by category. Categories are stored on individual time entries and do not determine how rows are organized.
The footer displays the total time recorded for each day and the overall total for the week.
Each row can have one of the following statuses:
- Not submitted
- Submitted
- Rejected
- Approved
A lock icon appears on entries that can no longer be changed. Hover over it to see why: the entry was locked on approval, locked by a lock date, or has been invoiced.
See Understanding and Configuring Timesheet Locks for information about locked entries.
If any time entry on a row has already been invoiced, the row cannot be withdrawn from approval. A receipt icon indicates that the row contains invoiced time.
Navigate Between Weeks
- Use the left and right arrows beside the week picker to move one week at a time.
- Select the calendar icon to jump to a specific week.
- Select This week to return to the current week.

You can navigate to a past or future week and log time for a date in that week.
Add Tasks and Non-Project Activities
Select Add and choose what you want to add.
| Option | What it does |
|---|---|
| Add tasks | Lets you search for tasks, filter them by project, and add one or more tasks to your timesheet. |
| Add activities | Lets you add ad hoc, non-project work. You can create an activity or select an activity submitted during the previous week. |
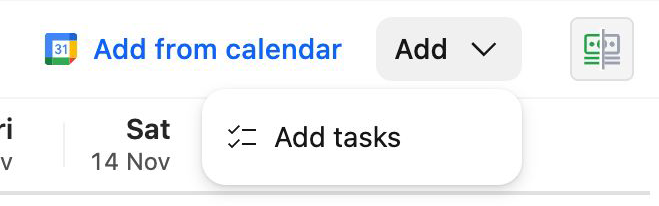
Adding a task or activity creates a work-item row. You can then log time against it for any day in the selected week.
You can also add rows in bulk:
| Option | What it does |
|---|---|
| Add rows > Add rows from last week | Adds the rows from your previous week's timesheet to the selected week. |
| Add rows > Import from my allocations | Creates time entries from the work you are allocated to in Resource Management. |
| Add from calendar | Adds time entries from events in your connected Google or Microsoft calendar. |
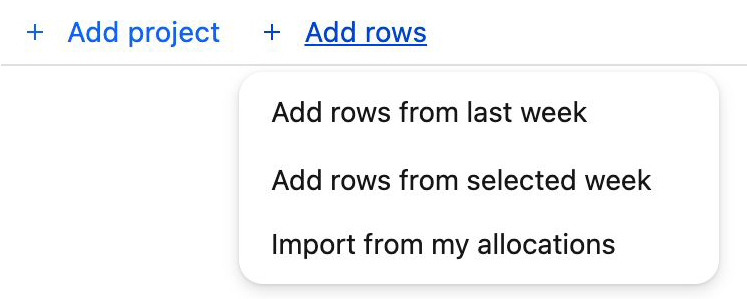
See Importing Time Entries from Allocations and How to add Events from your Google Calendar to your Timesheet for details.
Log Time from My Timesheet
Use My Timesheet when you want to record time while reviewing or planning your week.
- Navigate to the relevant week.
- Add the task or activity if it is not already included.
- Select the required day on the task or activity row.
- Enter the duration.
- Choose a category if required.
- Set the billable status, if applicable.
- Add notes and complete any custom fields.
- Save the entry.
You can follow the same process for past and future dates.
Alternatively this can be done on a project level by navigating to the Financials > Tracked Time section in a project.
Log Time from a Task
Use this option when you are already viewing a task and want to record time without opening My Timesheet.
- Open the task from its project.
- Select the timer icon from the upper-right corner.
- Complete the fields in the Time entry for today panel.
- Select Add time entry.
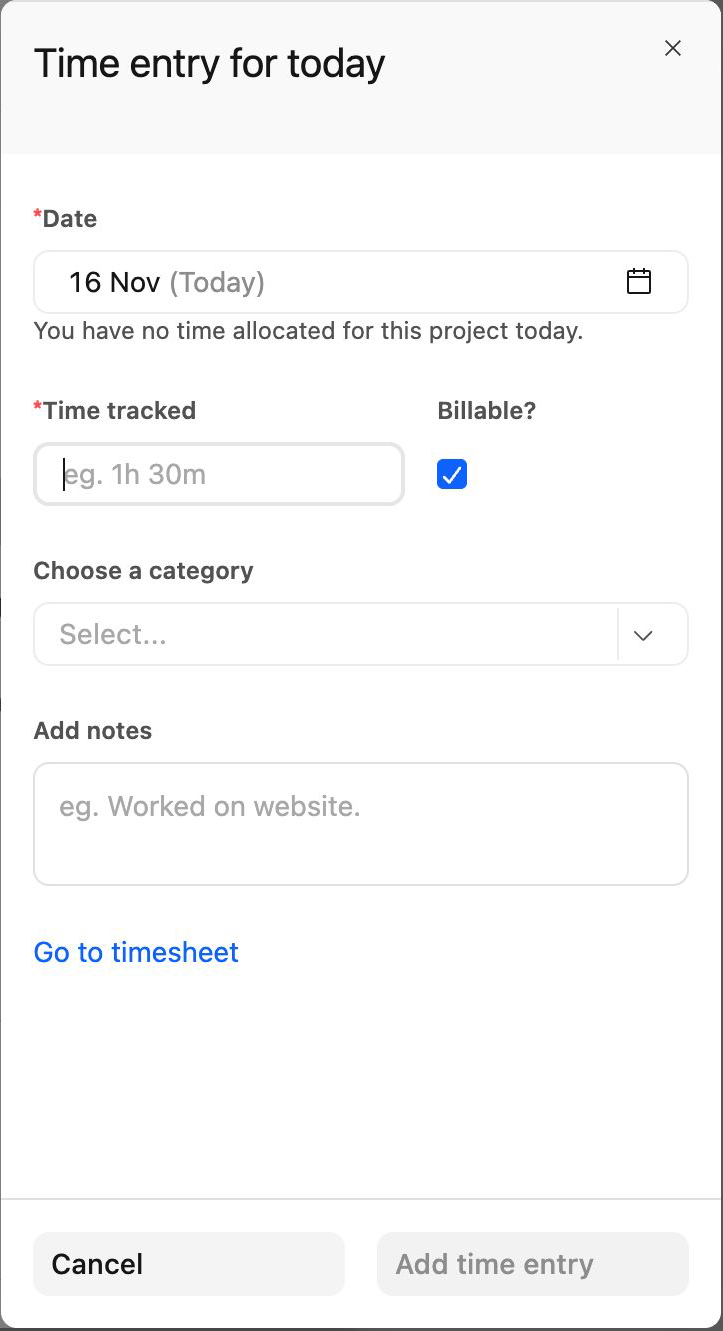
The project and task are selected automatically and cannot be changed when you add time from a task.
Time-Entry Fields
| Field | What to enter |
|---|---|
| Date | The date for the time entry. It defaults to today. |
| Time tracked | The duration, for example, 1h 30m. |
| Billable? | Whether the time is billable. This option may be unavailable when the task or budget is non-billable, or when you do not have permission to override it. |
| Role | The role under which the time was logged. This appears only when roles are configured for your account. |
| Category | The applicable time-entry category. This is required when your admin has made categories mandatory. |
| Project budget | The budget against which the time should be recorded. This appears on projects with multiple budgets and is required when shown. |
| Notes | Optional information about the work completed. |
| Custom fields | Any additional time-entry fields configured by your organization. |
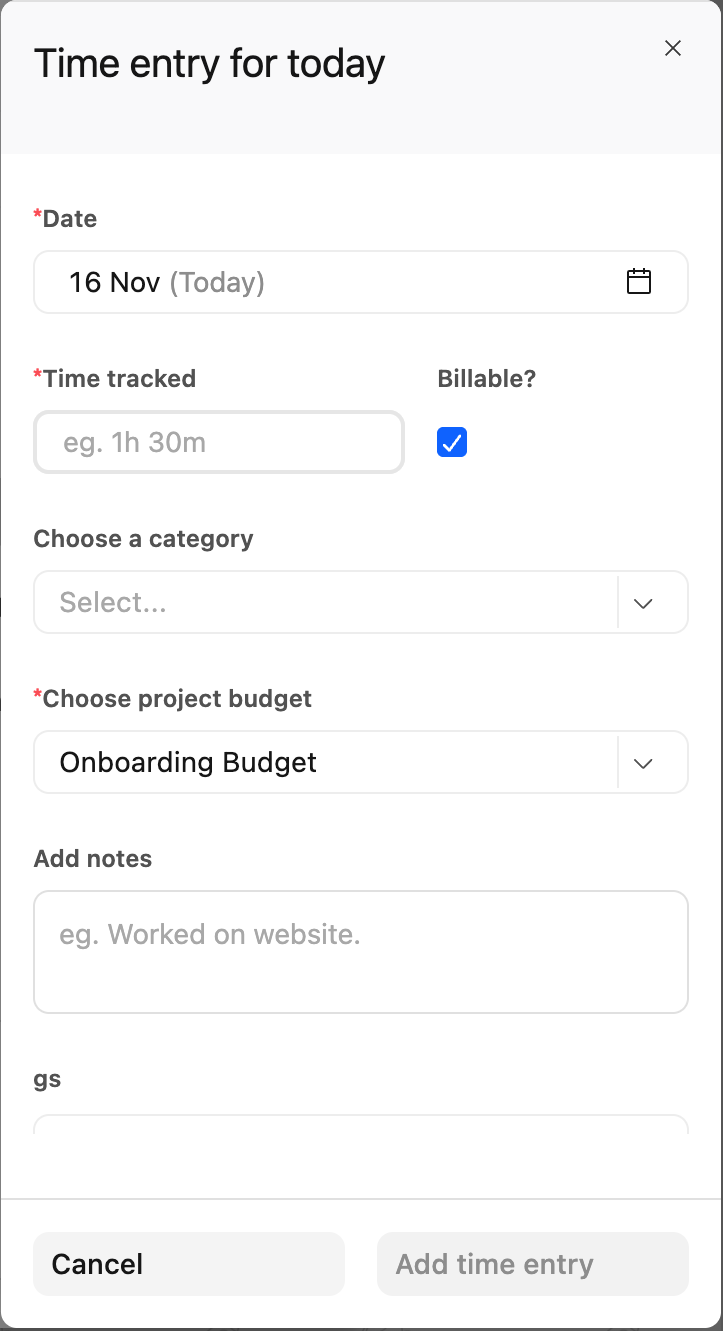
After saving, select Go to timesheet if you want to review the entry in My Timesheet.
The task panel does not provide a list of time entries previously logged against the task. Review them from My Timesheet.
View Billable and Non-Billable Totals
By default, the Total column and footer combine billable and non-billable time.
Select the Split billable & non-billable time icon to display billable and non-billable amounts separately. Select it again to return to combined totals.
This changes only how totals are displayed. It does not filter or hide any work items.
Edit a Time Entry
- Open the time entry from My Timesheet.
- Update the required fields.
- Save your changes.
Delete a Time Entry
- Open the time entry from My Timesheet.
- Delete the entry.
Submit or Withdraw Your Timesheet
When your timesheet is ready, select Submit week for approval.
To make changes after submitting it, select Withdraw submission, provided withdrawal is still allowed. After withdrawing the timesheet, update the required entries and submit it again.
A row containing invoiced time cannot be withdrawn.
See Submitting, Withdrawing, and Rejecting Timesheets for the complete submission and withdrawal process.
Log Time for Someone Else
Logging or adjusting another team member's time is a permission-controlled action available through List View. Managers and admins typically use it to add or correct time on someone's behalf.
Open List View
You can access List View at the account or project level.
| View | How to open it |
|---|---|
| Account-wide List View | Select Timesheets from the left navigation, and then select Manage and approve > List view. |
| Project-specific List View | Open the project and select Financials > Tracked time. |
Add the Entry
- Select Add time.
- Select the person from the Team member field.
- Select the project, if it has not already been set.
- Choose the task or activity, date, and duration.
- Set the billable status, role, category, and budget, as applicable.
- Add notes and complete any custom fields.
- Select Save.
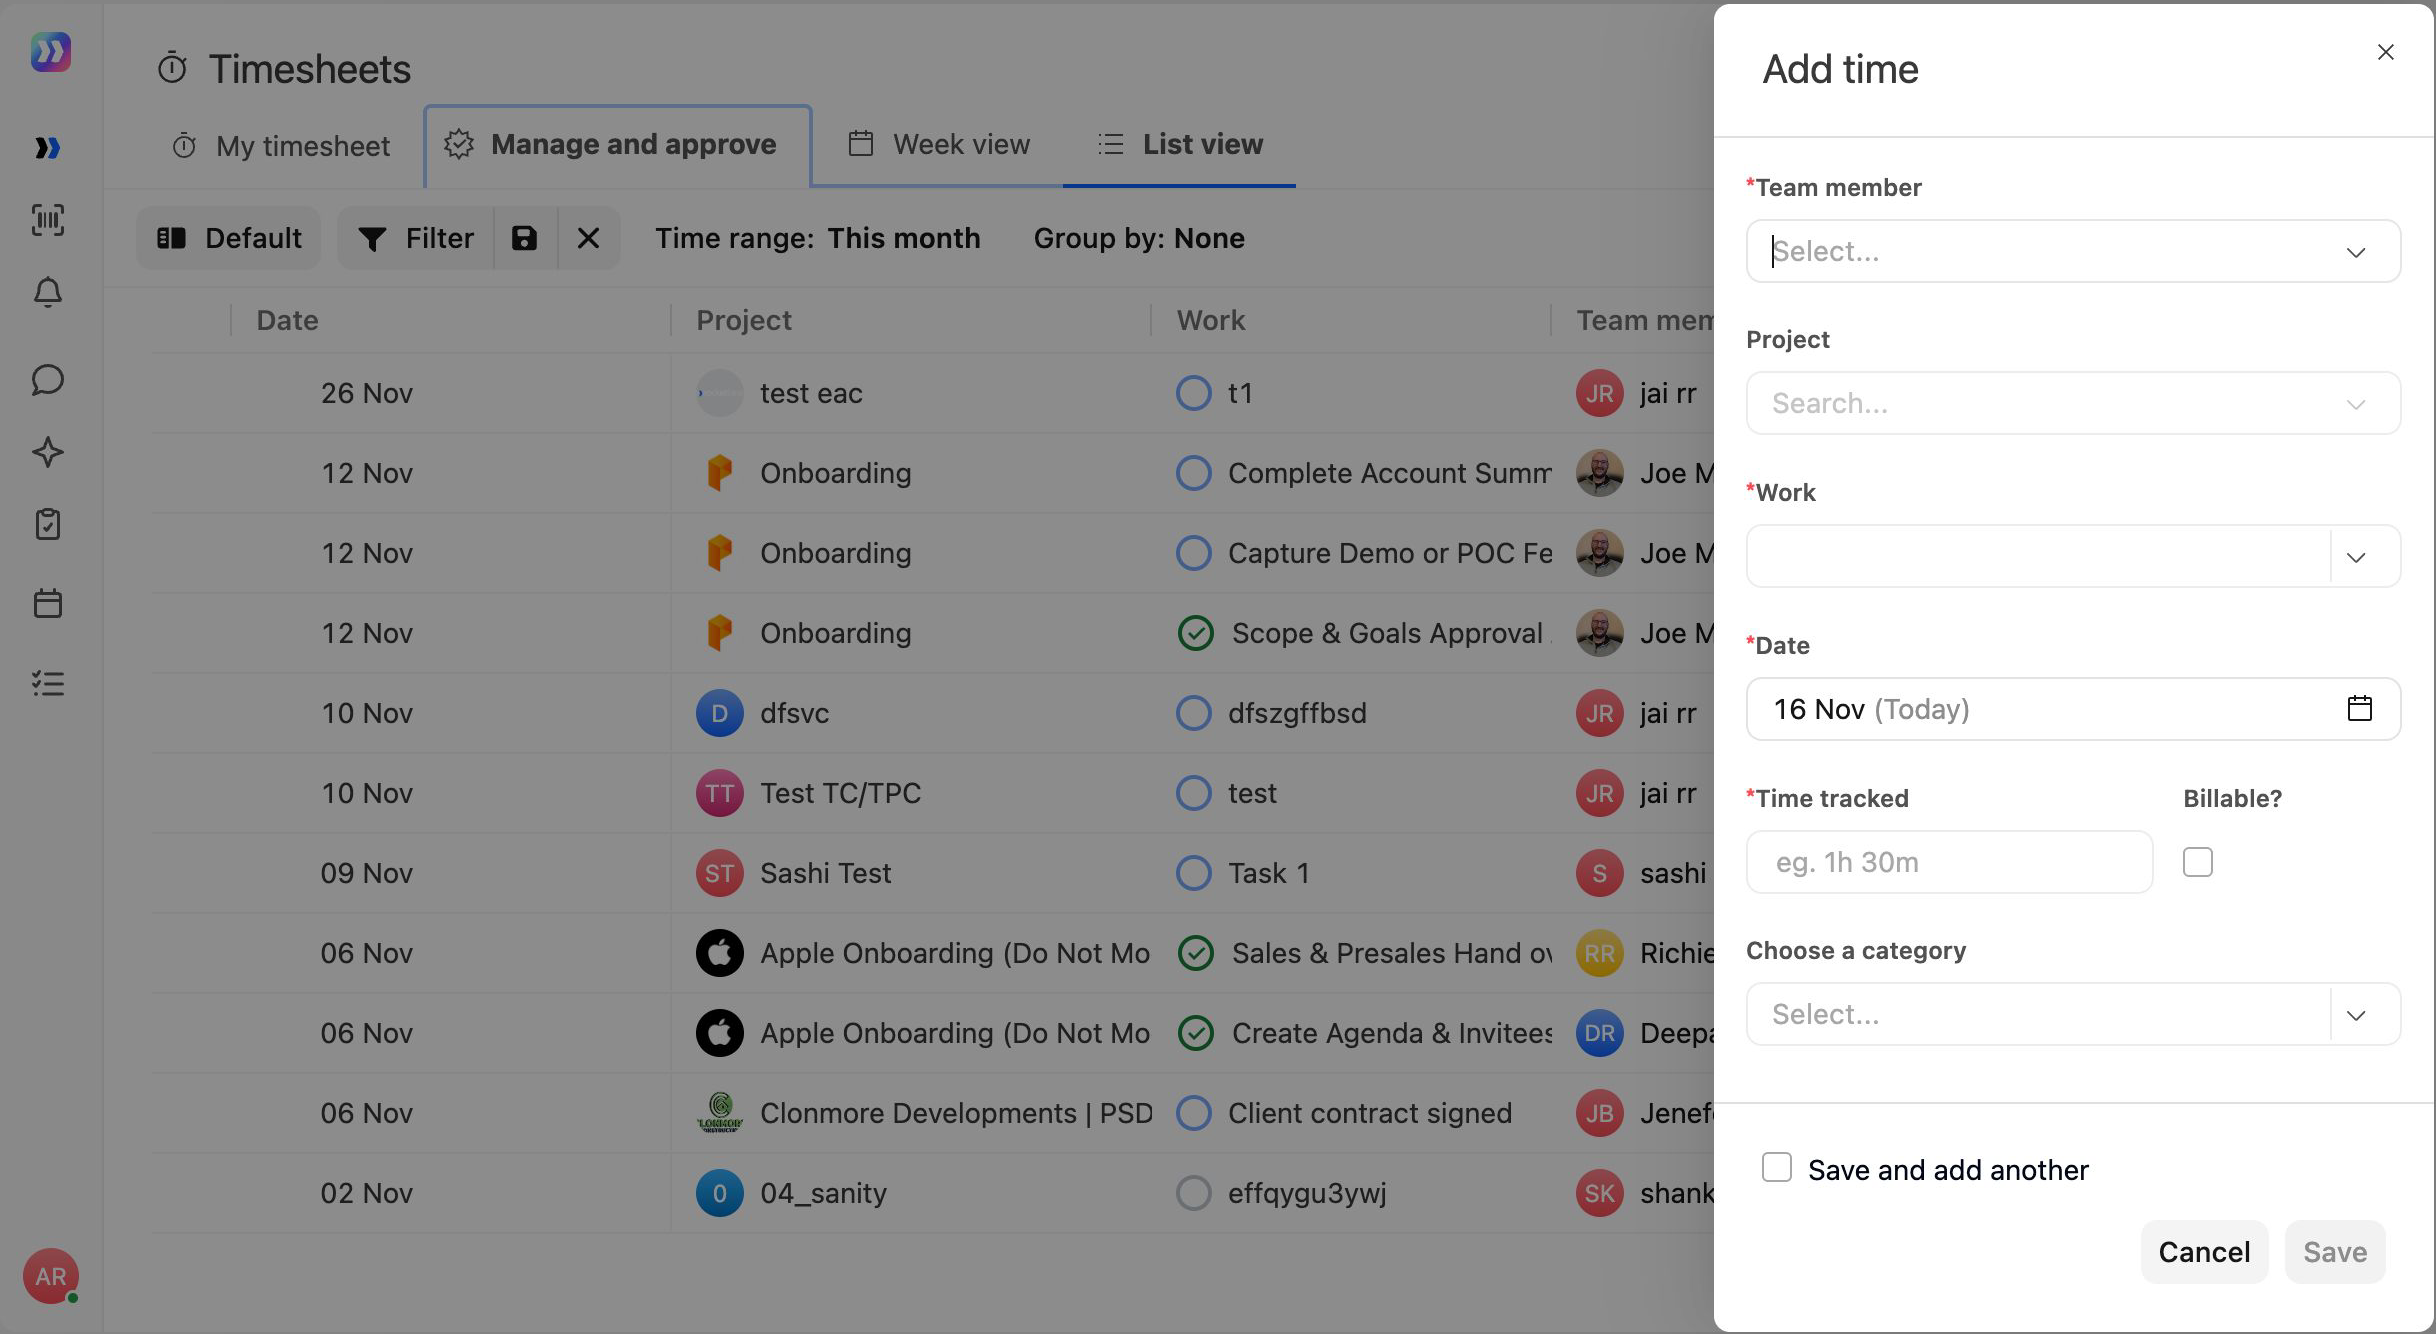
To add multiple entries consecutively, select Save and add another before saving.
The people available in the Team member picker depend on where you add the entry:
- From the account-wide List View, you can initially search for anyone on the account.
- After selecting a project, the picker displays only members of that project.
- Customer users, inactive users, and partner users whose company is not enabled for time tracking are excluded.
- Partner users can select only people from their own company.
See Enhanced Time Tracking and Approval Experience in Rocketlane for permission requirements. See Timesheet List View: Bulk Actions and Exporting Timesheets for other List View capabilities.
FAQ
Can I change which day my week starts on?
No. Every timesheet runs from Monday through Sunday. This cannot be configured for an account or individual user.
Can I log time in another week?
Yes. Use the arrows or calendar picker to navigate to a past or future week, and then add the entry for the required date.
Can I filter or save a custom view of My Timesheet?
No. My Timesheet does not support saved filters or custom views.
Filtering is available inside Add tasks to help you find tasks. Saved filters and views are available in List View for approvers and admins.
Why was a row's menu replaced with a receipt icon?
At least one time entry on that row has already been invoiced. Invoiced rows cannot be withdrawn from approval, so the receipt icon replaces the row menu.
Why can't I edit or delete an entry?
The entry may have been approved, or its timesheet period may be locked. Depending on their permissions, a project owner, manager, or admin may still be able to update it.
See Enhanced Time Tracking and Approval Experience in Rocketlane.
Can I log time for a task that is not assigned to me?
This depends on your account's time-tracking permissions. See Enhanced Time Tracking and Approval Experience in Rocketlane for the available access rules.
What happens if I leave a required category empty?
Rocketlane does not save the entry until all required fields are completed.
See Setting Up Timesheet Categories in the Configuring Timesheets folder.
Can I view my entire team's timesheets?
This depends on your role and permissions. Approvers and managers may have access to views covering their team's time.
See Enhanced Time Tracking and Approval Experience in Rocketlane.