In this article
Enable Time Tracking
- Click your profile icon from the left navigation bar and go to Settings.

- Select Time Tracking.

- Turn on the Time Tracking toggle.

- After Time Tracking is enabled, configure the settings based on how your team should report time.

Configure Time Tracking settings
After enabling Time Tracking, you can configure how timesheets are submitted, what team members can report time against, whether approved entries can be edited, and how rejected hours should affect reporting.
Timesheet due date
Use Timesheet due on every to set the weekly due date and time for your team's timesheet submissions.

Timesheet reminders
Use Send Reminders to remind your team to submit their timesheets.

Track time against
Use Track time against to define the project objects your team can report time on. For example, you can let team members track time against tasks, phases, milestones, or activities.
Reporting restrictions
Use Team members can only report time for to control where team members can submit time. You can restrict team members to tracking time only on projects they are part of and choose the project statuses for which time can be reported.

Lock time entries
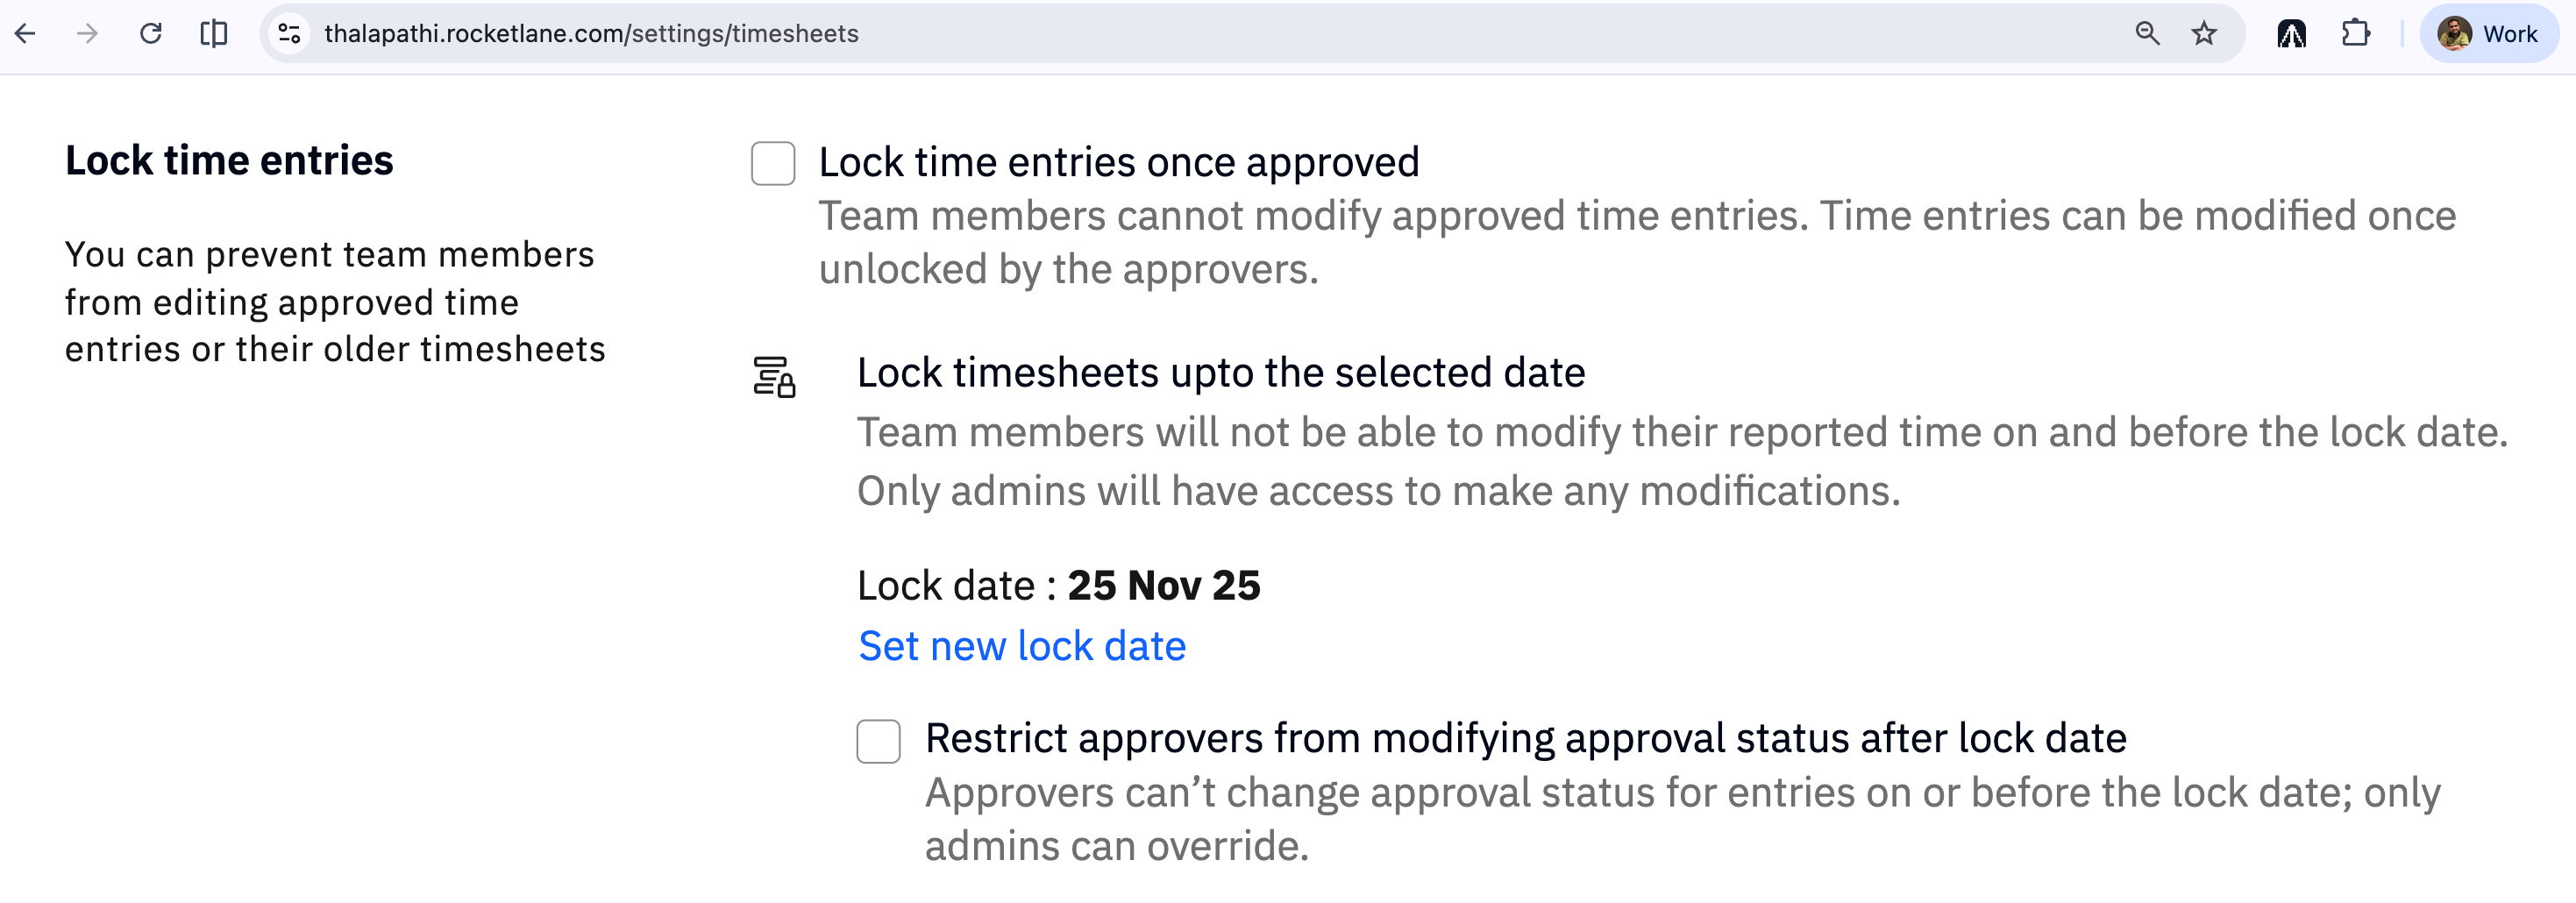
Enable Lock time entries once approved to prevent users from withdrawing, editing, or resubmitting their timesheets after approval.
Lock timesheets by date
Use Lock timesheets up to the selected date to prevent changes to time entries dated on or before a specific lock date.
- Team members cannot change reported time on or before the lock date.
- Admins, or roles with the required permissions, can change time entries made on or before the lock date.
- By default, approvers can change the approve or reject status for entries on or before the lock date.
- If the option to restrict approval actions on or before the lock date is enabled, approvers cannot submit, approve, reject, or withdraw entries dated on or before the lock date. Only admins can change the status of these locked entries.
- Approvers can always change the approve or reject status for entries after the lock date.
- Click Set lock date to choose the lock date.
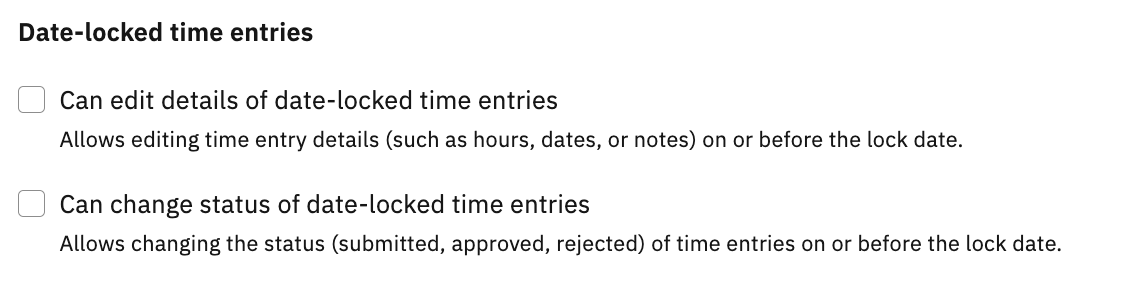
Permissions for date-locked time entries include:
| Permission | What it controls |
|---|---|
| Can edit details of date-locked time entries | Controls whether hours, dates, and notes on locked entries can be edited. |
| Can change status of date-locked time entries | Controls whether locked entries can be submitted, approved, rejected, or withdrawn. |
Calendar integration
Enable Calendar Integration to connect a calendar and use calendar events to populate relevant information in timesheets.

Hours to be reported
Use Hours to be reported to set limits on the total number of hours that can be tracked in a timesheet. You can define an exact number of hours or set minimum and maximum hour restrictions.

Time entry categories
Categories help you classify the type of work your team spends time on. Team members can select a category while adding time entries.

Approval settings
Approval settings let project owners or managers approve timesheets for users.

Timesheet exclusion
Use Timesheet Exclusion to create a list of team members who are not required to submit time. Excluded team members do not receive submission reminders, and their time is not counted toward team capacity.

Assign default values to activities
You can assign default values to predefined activities, making time tracking more consistent for your team.
Assign default values
- Go to Settings > Time Tracking.
- Define default values for predefined activities in the activities section.
Who can manage predefined activities
Teams often keep a fixed list of project and non-project activities so time is reported the same way across the account. Because this list affects every team member's timesheet, only some roles can change it.
| Action | Who can do it |
|---|---|
| Add a project or non-project activity in Settings > Time Tracking | Users with Can manage Time tracking settings |
| Edit an activity's name, Category, or Billable default | Users with Can manage Time tracking settings |
| Delete an activity | Users with Can manage Time tracking settings |
| See and select predefined activities when logging time | Anyone with access to Time Tracking |
A team member can see the activities list but can't add or edit activities. Why?
Viewing the list only needs Time Tracking access. Adding, editing, or deleting activities needs the Can manage Time tracking settings permission. Ask an account admin to add this permission to the team member's role.
Can a user who can edit other account settings turn off Time Tracking?
Only if their role also includes Can manage Time tracking settings. Other account-level edit permissions don't cover the Time Tracking toggle.
Change project and work options in time entries
You can update the project and work options for existing time entries when the associated work changes.
- Open the time entry you want to edit.
- Update the project or work option based on the configurations set in Settings > Time Tracking.
Rejected hours in Time Tracking
Rocketlane provides a setting for managing rejected hours. When enabled, rejected time entries stop contributing to key project calculations, helping keep reporting accurate.
Enable rejected hours
- Go to Settings > Time Tracking.
- Locate the Rejected Hours setting.
- Turn on the setting.

Once enabled, rejected time entries are excluded from the following metrics:
| Metric | Impact |
|---|---|
| Project tracked hours | Rejected hours no longer count toward total tracked hours for the project. |
| Project billable and non-billable hours | Rejected time entries are excluded from both billable and non-billable hour calculations. |
| Project revenue calculations | Rejected hours are excluded from revenue calculations for Time and Material projects and tracked-hours-based revenue recognition methods for Fixed Fee and Subscription projects. |
| Project costs | Rejected hours are ignored when calculating project costs. |
| Team member utilization | Rejected time entries are excluded from utilization metrics. |
| Team member analytics | Rejected hours are excluded from individual team member analytics. |
| Utilization reports | Utilization percentages ignore rejected time entries in resource efficiency reports. |