TABLE OF CONTENTS
The Project Plan tab gives you an organised, detailed view of your project. Use it to track progress, identify at-risk tasks, and manage your team's work across phases and timelines.
Project plan views
The project plan has two views:
- Board view - a birds-eye view of the project flow with a focus on phases, tasks, and assignees.

- Timeline view - track dates and project timelines using a Gantt chart format.

Project plan menu bar

Tasks filter
Filter tasks based on their completion status:
- All tasks
- Incomplete tasks
- Completed tasks

Responsible filter
The Responsible filter lets you view tasks based on which organisation is accountable - filter by Vendor or Customer.
Present
The Present icon enters full-screen presentation mode and displays a clean overview of the project plan.
Board view: Presents each project phase sequentially. Use the arrow icons in the top-right corner to navigate between phases.
Timeline view: Presents project timelines without displaying private phases and tasks.
Export
Export converts the project plan into a PDF or Excel file. Clicking Export opens a dialog box with the following options:
Click Export after adjusting the file properties to download the file.
The board view
The board view presents all project phases in a column-wise format, with tasks listed under each phase.
Project phases
Rocketlane projects are divided into phases for easier planning and execution.
Editing project phases
Each project phase can be edited from the board view in the Project Plan tab.
- Click the Edit project phase icon next to the phase name.

- The Edit project phase dialog box opens.

- From the dialog box you can:
- Edit the phase name.
- Edit the start date and end date.
- Edit the privacy type - choose between Private and Shared.
- Click Delete phase to delete the phase.
- Click Save to apply the changes.
Changing the project phase status
Change the phase status from the board view. Click the status indicator next to the phase name and choose from:
- To do
- In progress
- Completed
- Blocked
Adding project phases
Scroll right to the last phase and click the Create project phase icon to add a new phase.
You can add a new phase in two ways:
- Import phases using project templates: Add phases by importing a project template from the project plan view. Go to Create project phase > Import templates. Learn more about importing phases.
- Create a new project phase: Choose Create project phase, then add the phase name, start date, due date, and privacy type. Click Save to create the phase.

Reordering project phases
You can manually reorder phases to control how the project plan is structured. When manual phase ordering is enabled, phases do not automatically reorder based on their start dates in the Timeline or Board view - you can drag and drop phases instead.
To enable manual phase ordering:
- Go to Settings.
- Select Workflow Management.
- Enable Manual phase ordering.
Once enabled, navigate to your project plan and select the phase you wish to move. Choose Rearrange phases from the options, then simply drag and drop the phases into your preferred order. When importing phases from a template, newly added phases are placed at the end and can be reordered after.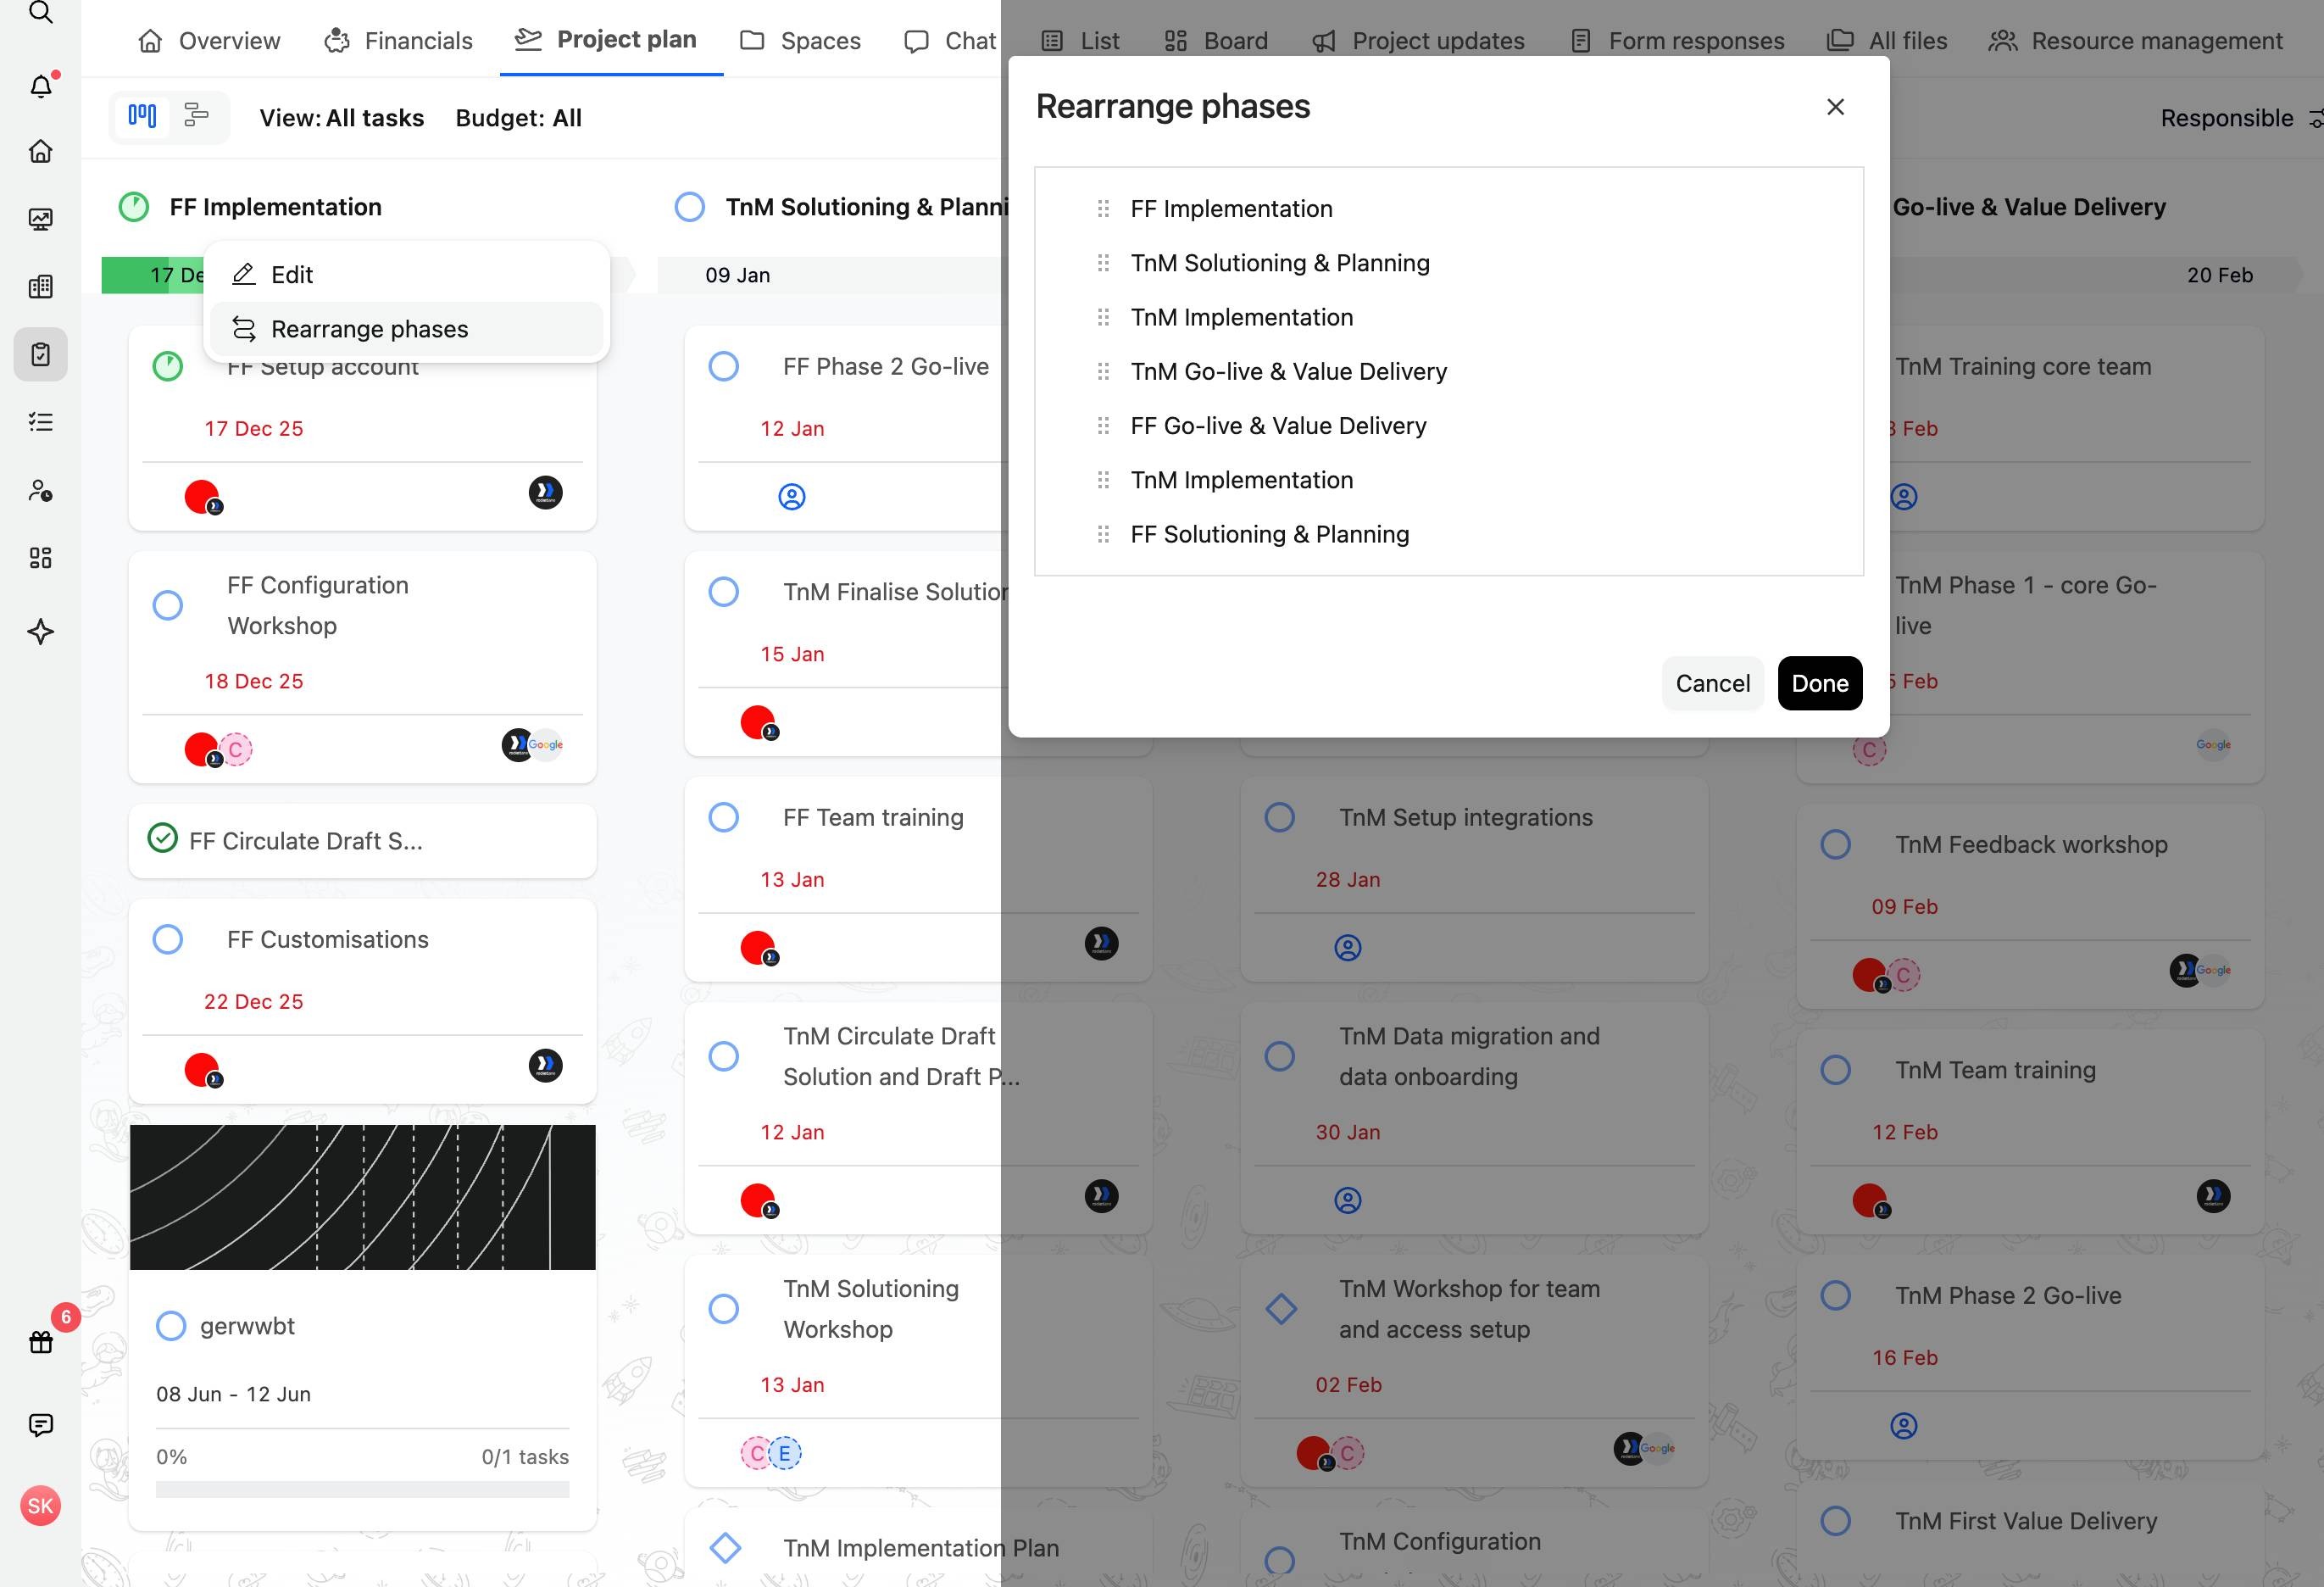
Project tasks
Each project phase consists of tasks, which make it easier to delegate resources and manage the project in detail.
Task properties
Click on any task to edit its properties from the detail pane. Learn more about task properties.
Adding a task to a phase
- Click the Add task button at the end of each phase.

- The add task dialog opens.

- Fill in the task details:
- Task name
- Assignee
- Due date
- Description
- Click Create to save the task.
The timeline view
The Timeline view lets you track dates and project timelines using a Gantt chart format.

Change the start and end date of a task by sliding its timeline bar. Drag the ends of the bar to change the task duration. Phase dates are automatically synchronised based on the earliest task start date and the latest task end date.
The view has four columns followed by the Gantt chart. The columns are Project Plan (phases with expand/collapse), Start date, Due date, and Duration.

Baseline
The Baseline feature saves a reference point for your project timelines, giving you a record of how far you have deviated from the original plan.
Creating a new baseline:
- Go to Baselines > New.

- Give the baseline a name and add optional notes.
- Click Save.

To view a saved baseline, select it from the options under Baseline. Grey bars on the timeline represent the baseline.
Shift dates
Shift dates lets you adjust phase and task dates in bulk when there is a delay or acceleration in project timelines - without visiting each task individually.
Click Shift dates from the top navigation bar.
The Shift dates dialog opens. Configure the parameters and optionally save a baseline before making changes.
Timeline view controls
Creating task dependencies
Create task dependencies directly from the timeline by linking the end of one task bar to the start of another.
Quicker task actions in timeline view
Under More actions in the timeline view, you can perform the following without opening the task details:
- Convert a task to a milestone
- Move it to a different phase
- Make it private
- Delete it

Range picker
The range picker lets you select both the start and end dates for a task at once, directly from the start or due date column - without needing to adjust duration settings separately.