Creating Date-Based Billing Events
Date-based billing events are used when you want an invoice to be triggered on a specific calendar date, independent of any particular task or project status. This is useful for recurring time-based billing (e.g., monthly invoices) or a one-time scheduled invoice on a set date.
To create a date-based billing event:
- Initiate a New Billing Event: In the project’s Billing Schedule area, choose the option to create a new billing event (this may be a button like Add Billing Event or part of the billing schedule interface). When prompted for the Billing Event Type, select Date based.
- Set Billing Trigger (Date) – Provide the timing and action for the event:
- Invoice Create Date: Pick the exact date when the invoice action should occur. This is the date the system will either generate the invoice or send the reminder. (For example, select May 30, 2025 if you want an invoice for that project to be created on May 30, 2025.)
- Action: Choose what should happen on that date:
- Create draft invoice – an invoice draft will be automatically created on the chosen date.
- Create in-review invoice – an invoice will be created and marked as "In Review" on that date (perhaps if your workflow involves review before sending to the client).
- Send reminder to create invoice – no invoice is auto-created; instead, the system will send a notification on that date reminding the responsible user to create the invoice.
- Create draft invoice – an invoice draft will be automatically created on the chosen date.
- Ensure the date and action are correct, then proceed to the next step.
- Invoice Create Date: Pick the exact date when the invoice action should occur. This is the date the system will either generate the invoice or send the reminder. (For example, select May 30, 2025 if you want an invoice for that project to be created on May 30, 2025.)
- Set Invoice Details – Configure the content of the invoice that will be generated:
- Issue/Due Dates: Specify how to set the invoice’s dates relative to the creation date. Just like in a billing schedule, you can set an issue date offset (e.g., 0 days so it issues on the trigger date, or perhaps if you want the invoice document dated the first of the next month, you might adjust accordingly) and a due date (e.g., 30 days after issue).
- Line Items: Define what line items the invoice should contain. In a date-based scenario, you might be billing for a time period or a fixed installment:
- You could, for example, add a line item saying "Services for March 2025" with the total amount of services provided in that month. You would manually enter the amount or rate for that line item.
- If the system supports pulling in unbilled time entries up to that date, you might use a line item template or placeholder for that (otherwise, you may simply create the event as a reminder and then manually compile the invoice).
- Add any additional lines or taxes as needed, or use a saved line item template if available.
- You could, for example, add a line item saying "Services for March 2025" with the total amount of services provided in that month. You would manually enter the amount or rate for that line item.
- Review the invoice details to ensure accuracy.
- Issue/Due Dates: Specify how to set the invoice’s dates relative to the creation date. Just like in a billing schedule, you can set an issue date offset (e.g., 0 days so it issues on the trigger date, or perhaps if you want the invoice document dated the first of the next month, you might adjust accordingly) and a due date (e.g., 30 days after issue).
- Save the Billing Event: Click Create or Save to finalize the date-based event. The event will now appear in the billing schedule list for the project, typically showing the trigger date and the configured action. When the specified date arrives, Rocketlane will automatically carry out the action. E.g., generating the invoice draft and populating it with the defined line items.
You can set up multiple date-based events if your project requires more than one scheduled invoice (for example, a project might have a billing event on the last day of each month). Each event will handle one occurrence; for a repeated cycle, you would create multiple events or update the schedule template accordingly.
Creating Task-Based Billing Events
Task-based billing events tie invoice generation to the completion (or status change) of a specific task. This is ideal for milestone-based billing — for instance, “Invoice 20% when Task X is completed.”
To create a task-based billing event:
- Start a New Billing Event: Go to the project’s Billing Schedule section and add a new billing event. Select Task based as the Billing Event Type (if not already selected by default).
- Set Billing Trigger (Task Status) – Define which task and status change will trigger the invoice:
- Task: Choose the specific project task that will trigger the invoice. A dropdown or selector will list all tasks in the project – pick the milestone or deliverable that you want to link to this billing event.
- Status Trigger: Specify the status change that should fire the event. You will typically set a transition from one status to another. For example, you might configure the trigger as when the task moves from “In Progress” to “Completed”. (In the UI, you may select a “from status” and a “to status”. If the goal is simply the task’s completion, you could use Any or Open as the from-status and Completed as the to-status.)
- Action: Choose what happens when the task reaches that status:
- Create a draft invoice, mark an invoice as in-review, or send a reminder, as described earlier. For milestone billing, you’ll likely choose to auto-create an invoice draft or in-review so that it’s ready to send once the task is done.
- Create a draft invoice, mark an invoice as in-review, or send a reminder, as described earlier. For milestone billing, you’ll likely choose to auto-create an invoice draft or in-review so that it’s ready to send once the task is done.
- This step essentially links the task’s workflow with the billing system: once the task meets the condition, the system knows it’s time to bill.
- Task: Choose the specific project task that will trigger the invoice. A dropdown or selector will list all tasks in the project – pick the milestone or deliverable that you want to link to this billing event.
- Set Invoice Details – Configure the invoice that will be generated upon the task’s completion:
- Issue/Due Dates: Set the offsets for the invoice dates (issue date relative to trigger, and due date relative to issue) as needed. For most task triggers, you can set the issue date offset to 0 so the invoice is dated the day the task completed (or keep it 0 and just rely on due date offset for payment terms).
- Line Items: Define the contents of the invoice:
- Typically, you might want the invoice to have a line item referencing the milestone task. For example, add a line item with a description like “Completion of [Task Name]”, quantity 1, and the agreed billing amount for that milestone.
- Enter the amount to invoice for this task. If this project is fixed-fee and this milestone represents a percentage of the total project fee, you can calculate that percentage and enter the corresponding amount here. (For instance, if Task X is 20% of the project fee, and the total project fee is $10,000, you would enter $2,000 as the line item amount.)
- If needed, include additional items (perhaps to list any expenses or time & materials associated with that task if it’s a mix) or taxes. However, in many cases milestone invoices are a single line item for the milestone itself.
- Typically, you might want the invoice to have a line item referencing the milestone task. For example, add a line item with a description like “Completion of [Task Name]”, quantity 1, and the agreed billing amount for that milestone.
- Ensure the line item(s) correctly reflect what needs to be billed when the task is done.
- Issue/Due Dates: Set the offsets for the invoice dates (issue date relative to trigger, and due date relative to issue) as needed. For most task triggers, you can set the issue date offset to 0 so the invoice is dated the day the task completed (or keep it 0 and just rely on due date offset for payment terms).
- Save the Billing Event: Click Create/Save to finalize the task-based event. The event will be listed in the project’s billing schedule/events list. Now, when the specified task changes to the defined status, Rocketlane will automatically perform the selected action:
- If you chose to create a draft/in-review invoice, the system will generate the invoice at that moment. You can then review it (add any actual time entries or expenses if needed, since by default it will have the line items you configured) and send it to the client.
- If you chose a reminder, the responsible team member will get a notification that it’s time to create the invoice for that task.
- If you chose to create a draft/in-review invoice, the system will generate the invoice at that moment. You can then review it (add any actual time entries or expenses if needed, since by default it will have the line items you configured) and send it to the client.
Task-based events are perfect for ensuring you don’t forget to bill for project milestones. They essentially link your project management progress with billing.
Creating Project-Based Billing Events
Project-based billing events trigger invoice actions based on the overall project status. Use this when you want to bill at a particular phase of the project or upon project completion as a whole, rather than a specific task. For example, you might want to invoice a client when the project reaches the “Closed” or “Completed” stage.
To set up a project-based billing event:
- Add a New Billing Event: In the project’s Billing Schedule interface, create a new event and choose Projectbased as the Billing Event Type.
- Step 1: Set Billing Trigger (Project Status) – Select the project status that will trigger the billing event:
- Project Status Trigger: Choose the status (from your project’s status workflow) that, when reached, should cause the invoice action. For instance, select Completed or Closed if you want to bill when the project is finished, or perhaps a mid-project stage like UAT Sign-off if that’s a billable milestone. In the configuration, you might see an option like “Trigger when project status changes to [Selected Status]” – e.g., when project status changes to Completed.
- (If applicable) From Status: Some configurations might allow specifying from->to (for example, from any previous status to “Completed”). In most cases, simply choosing the target status is sufficient.
- Action: Select the action to perform once the project hits that status (create draft invoice, in-review invoice, or send a reminder) as described above. Often for project completion, you would auto-create the final invoice.
- Project Status Trigger: Choose the status (from your project’s status workflow) that, when reached, should cause the invoice action. For instance, select Completed or Closed if you want to bill when the project is finished, or perhaps a mid-project stage like UAT Sign-off if that’s a billable milestone. In the configuration, you might see an option like “Trigger when project status changes to [Selected Status]” – e.g., when project status changes to Completed.
- Set Invoice Details – Define the invoice particulars for when the project status change occurs:
- Issue/Due Date: Set how the invoice dates should be handled. Typically, you might issue the invoice immediately when the project completes (issue date offset 0 days) and set a net payment term for due date (e.g., 30 days after issue).
- Line Items: Configure the line items of the invoice:
- If this is the final project completion invoice (for a fixed-fee project), you might have a line item for the remaining percentage of the project fee. For example, if you billed 50% upfront and 30% on UAT, this final invoice might be the remaining 20% of the fee. You would then add a line item like “Final Project Completion – 20% of project fee” with the calculated amount.
- For a time & materials project, maybe this invoice is to bill any remaining time entries or a wrap-up fee. You could list any final services provided.
- Include any other charges or credits that are due upon project completion, and add taxes if applicable.
- If this is the final project completion invoice (for a fixed-fee project), you might have a line item for the remaining percentage of the project fee. For example, if you billed 50% upfront and 30% on UAT, this final invoice might be the remaining 20% of the fee. You would then add a line item like “Final Project Completion – 20% of project fee” with the calculated amount.
- Make sure the invoice template covers everything needed for the final billing.
- Issue/Due Date: Set how the invoice dates should be handled. Typically, you might issue the invoice immediately when the project completes (issue date offset 0 days) and set a net payment term for due date (e.g., 30 days after issue).
- Save the Billing Event: Click Create/Save to finalize the project-based event. It will appear in the billing events list. When the project’s status is updated to the specified value, the system will trigger the event.
Timezone Control and Invoice Conditions
Set a timezone for date-based billing events
Date-based billing events support selecting a specific time and timezone for the event trigger, instead of relying only on the workspace default timezone.
Use this when billing needs to align with a customer’s timezone (for example, invoicing should trigger at the start of the customer’s business day rather than the internal team’s timezone).
Where this is configured:
- Create a Date-based billing event.
- In the Billing Trigger section, set the Invoice create date.
- Select the time and timezone for the trigger.
Once configured, the billing event triggers using the selected timezone rather than the account default.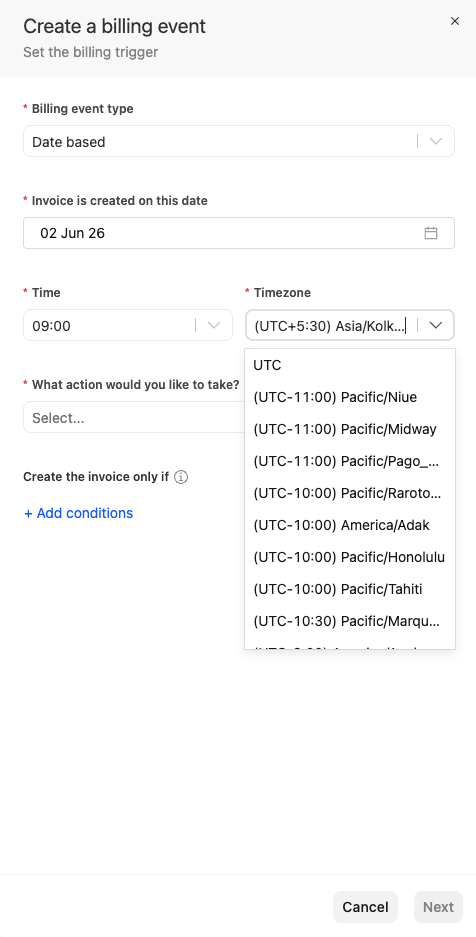
Add conditions for invoice creation
Billing events can include conditions that must be met before Rocketlane generates an invoice when the event triggers.
Use this when the event date or status trigger is not sufficient on its own, and invoice creation should be held back until certain criteria are satisfied.
Examples include:
- Do not create an invoice if the project is still in a pre-start status.
- Skip invoice creation if the project has a prepaid amount that has not yet been fully consumed.
Where this is configured:
- Create a billing event (Date-based, Task-based, or Project-based).
- In the billing event setup, locate the Conditions section.
- Add one or more conditions that must be met before invoice creation proceeds.
- Save the billing event.
If the billing event triggers but the conditions are not met, Rocketlane does not generate the invoice.
