Spending long hours creating project plans from scratch? Rocketlane has got you covered! You can now create templates that can be reused for projects with similar requirements.
Rocketlane provides new users with pre-built templates that can be easily customized to meet their project requirements. Alternatively, you can create entirely new templates from scratch and use them for your projects.
To simplify your project planning, a project template is divided into three sections that can be easily combined to create a comprehensive template. By importing this template into your project plans, you can prioritize important milestones without any hassle.
With the Project section, you can easily add all the necessary tasks to your project template and categorize those into phases. This feature lets you set project timelines, assign role based placeholders (example: Implementation Manager), and input other important details.
Using Spaces, you and your team members can collaborate with customers on files and create documents related to the project. Add the necessary files and templates to the Space for easy and secure collaboration.
Using the allocations tab, assign resources to your project. This allows you to specify the roles of team members and the number of hours they need to work on the project.
These sections have these views:
| Views | Projects | Spaces | Allocations |
List - Has the list of tasks, spaces, and dynamic conditions | ✅ | ✅ | |
| Timeline - a visual timeline displayed as a Gantt chart | ✅ | ✅ | |
| Dynamic - conditions that prevent certain tasks from being created for specific projects. | ✅ |
In this article
- Configuring the projects section
- Creating a list of the phases and tasks
- Bulk updates in project templates
- Managing phases and tasks timelines
- Setting up dynamic conditions
- Configuring Spaces
- Allocating resources
Configuring the projects section
When working on a project, team members need to handle various phases, tasks, and milestones. Each task comes with crucial information that helps the team members understand their roles and responsibilities at different stages of the project. You can set timelines for these tasks and ensure that specific tasks are dynamically utilized in projects.
To create a new template,
- Navigate to Templates
- Click the New project template button
- Name your template
- Under the Project tab, go to Lists view
Note: Make sure to save each section before proceeding to the next
Creating a list of the phases and tasks
You can create a list of all phases and tasks that a project should contain here.
Adding phases to the project
To add a new phase to your project plan,
- Go to the List view and click "Add New phase."
- Name the phase, such as "Kickoff meeting."
- Add a timeline to your project by specifying the start-on day. For instance, if the project's kickoff is planned for day 1 of a 60-day timeline, the start day will be noted as "1d".
- Specify the duration for the phase by indicating the number of days it should take to complete. For example, "5d" would mean that the kickoff should begin on day 1 and be finished within 5 days.
- Insert phase above - Use this to add a phase above your current phase
- Shift days - Use this to shift the start day of your phase to a later day
- Mark as private - Use this to mark the phase as private to only your team members and hide it from customers
- Delete - Use this to delete this phase and remove it from the template entirely
- You can access the key events tab on the right-hand side and mark the phase as a key event.
Adding tasks or forms to the project
Under the phases, you can add as many tasks and subtasks as possible.
- Click "add new task," name the task, add the "start-on" day and duration for the task to complete
- Choose an assignee for the task; for instance, if the sales hand-off requires the involvement of a Sales executive, you can designate the role of Sales as a temporary placeholder until the actual salesperson takes over the task once the project begins.
- You can click on the placeholder to select and deselect assignees
- Click done
On the right-hand side, you can add task details and additional info to the tasks
- Task info - You can add a task description and add a private note that is only visible to you

- Add attachments - To make it easy for the customer to reference necessary materials, you can attach any files, decks, or documents to the corresponding task.
- Under additional Info - You can fill out the task fields like efforts in hours, priority

- Time entry settings - Mark task as billable or non-billable

- Dependencies- To ensure completion of a primary task, you can add a dependent task that must be finished beforehand. Only then can you mark the primary task as completed.

- Add task above - Use this to add a task above your current task
- Mark as private - Use this to mark the task as private to only your team members and hide it from customers
- Mark as milestone - Marking a task as a milestone triggers a CSAT survey to your customers once the task is marked as completed
- Save as task template - You can save this task as a template and add it to projects in your project plan page.
- You can access the key events tab on the right-hand side and mark the task as a key event.
- By clicking the subtask icon, you can add a subtask below your main task
- Press Enter to finish adding the task
- You can add as many subtasks as you wish under a main task

Note: A task can have 3 levels of subtask nested within. Example (Main task → Subtask 1 → Subtask 1.1)
Bulk updates in project templates
You can bulk update assignees, task fields like efforts, priority, etc for a project template.
- To do this, click on the expand/collapse icon to show all the task fields in a list view.
- Hover near a task to check the box near it
- Similarly check the boxes near all the tasks to bulk select them.
- Once the tasks are selected, update assignees, effort and other fields for these tasks using the bulk editor on the right.
Note that you can only bulk select the tasks in the expanded list view.

Tip: Use Shift + click select a range of tasks for bulk updateManaging phases and tasks timelines
- The timeline view presents project timelines in a Gantt chart format, making it easy to see the overall schedule.
- You can easily adjust timelines by dragging them to the desired location.
- Additionally, you can create task dependencies by connecting the end of a dependent task to the start of the primary task.

Setting up dynamic conditions
If you don't wish to create certain phases or tasks for projects that don't need them, Rocketane has a solution with dynamic conditions in project templates. For instance, if you only want to use the kickoff meeting task for projects with an ARR of over $100K, you can create a dynamic condition for that task. This feature allows you to tailor your project templates to your specific requirements.
To set up the dynamic conditions,
- Click Add condition near the task you wish to make dynamic
- Under where select the project field to trigger the condition
- Choose the condition from the drop-down; it can be "is greater than," "is not empty," and so on, based on the type of project field you selected
- Enter the value based on which the condition should apply
- Note that you can add many conditions to make the task or phase dynamic
- Click done after adding all conditions
Configuring Spaces
Spaces inside the project template provide a central place for you to share important files and links with your customers and team members and collaborate with them seamlessly
Private Space: All the files added to this Space are visible and shared only with your team members
Shared Space: All the files added to this Space is visible and shared with team members and customers involved in the project
List in spaces - You can add a blank document or embed a URL or template under each phase in the Spaces list, which your team or customers can fill.
Dynamic conditions in spaces - Allow you to avoid creating spaces for projects that don't require them.

Allocating resources
Rocketlane allows you to allocate the resources and the time they will need to spend on the projects using this template.
- Under Allocations, click the new placeholder or new team member button to add a role or team member as a placeholder for the projects using the template
- To the right, you can view the project duration in days. Click near the placeholder or team member to block their time
- In the slider, start allocating the "hours per day" for that placeholder or team member, add the number of working days and click done
- You can also turn on auto-allocate so that the template can get the data of the effort and placeholder assigned from the tasks and auto-allocate the resources.

Note:
All the configurations done in the template will apply to all the projects that use the template.
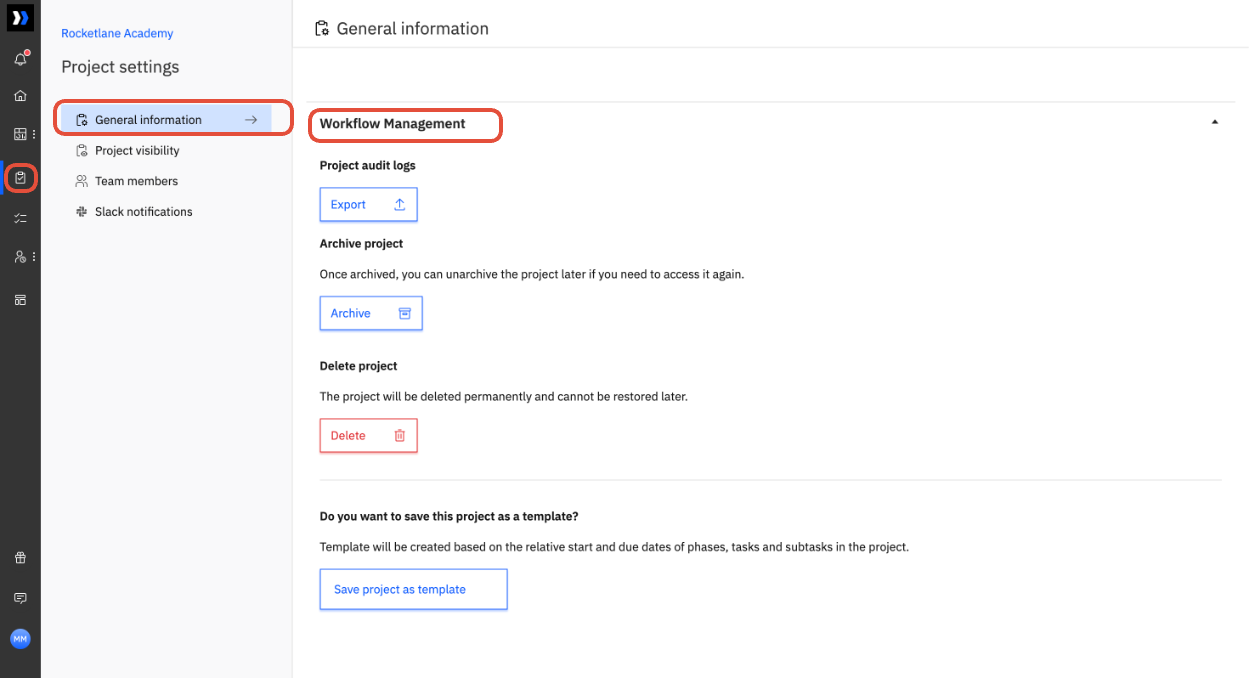
If you wish to convert a project into a template, you can do that under project settings.
To do that, Go to projects > select a project > click on settings > under general information > select workflow management and expand it > save project as template
Task Based Revenue Recognition
Rocketlane allows you to predefine task-based revenue recognition settings within a project template. When a user creates a milestone-based fixed fee project and applies a template with this configuration, the milestone revenue recognition plan is automatically applied.
You can set this up by navigating to:
Project Templates → [Select Template] → Settings → Task-Based Revenue Recognition
This configuration is applied only if the following conditions are met:
The template is the first one used in the project (whether during project creation or imported after).
There is no existing task plan already set up in the project.
The project type is fixed fee with milestone-based revenue recognition.
